Super-Macro Photography
Today has been another 'experimental photography' day and this will be a long post.
I've tried creating super-macro photographs before by holding a reversed lens in front of a normal lens but I decided that today I would give it a proper go and for that I needed to construct something to hold the lens for me. I've seen articles decribing how you can create a female to female link so that you can screw the filter thread of one lens to the filter thread of another using the camera blanking plate that comes with the camera body when you buy it. I didn't want to destroy mine however but I figured that I could probably come up with something that enabled me to get some good photos without needed to spend the day drilling and possibly irrevocably changing camera parts. For my super-macro lens I decided to use my macro lens as the lens connected to the camera and the kit lens that came with the camera as the reversed lens. From my experimentation before when I was just holding the two lenses together I knew that this would allow a reasonable depth of field but still get quite close into the subject.
Preparing the Kit Lens
I know that when using this technique, the field of view that the camera sees is greatly reduced so I wanted the kit lens to have the widest aperture possible to shoot through and then control the aperture using the macro lens and the camera. I fit the kit lens to the camera body, selected the lowest aperture value, pressed the preview depth of field button and then turned the camera off. I believe that this leaves the aperture set at it's last position. If it doesn't, I haven't lost anything by doing it!
Constructing the Lens
Using an old cereal box I cut a length of cardboard that was roughtly the same width as the two lenses would be when put together on the camera. I got three lenghts of sellotape ready to stick the resulting tube together and fiddled with the zoom on the kit lens until the lens was at it's zoomed in setting. Carefully holding the macro and kit lens together (with the kit lens reversed) I wrapped the carboard around the pair as tightly as possible and then affixed the edge down using the sellotape. I don't know whether it matters whether you wrap the shiny side of the cardboard on the inside or outside but I chose to have the shiny side on the outside. This was because I figured that if there was going to be a problem with light reflection inside the tube where the lenses didn't quite meet properly, having the dull side on the inside of the tube would help to minimise this.
Once the tube was securely stuck together, I needed to add a couple of extra strips of cardboard around the outside of the kit lens as the kit lens is slightly smaller than the macro in diameter. Later on into the shoot I also added a strip of tape which acted as a brace between the camera and the lens to hold it in the correct position as the weight of the extra lens was causing my cardboard tube to droop slightly. I stuck one end of the tape to the top of the pop up flash unit and the other to the end of the carboard tube.
My make-shift lens and camera were now ready.
Focussing
Although the macro focuses using an internal mechanism and so the lens length doesn't change with focus, I wanted to move the camera as little as possible. I therefore decided that I would move my subject instead of the focus ring. (Surprisingly, the tube gripped the macro lens tight enough to allow one to rotate the tube to rotate the macro focus ring.)
In order to get some control over how the subject was moving I used a vice I made during workshop training at work and placed the subject on the freely moving jaw of the vice. This meant that I could move the subject towards and away from the camera by winding in and out the vice jaw.
The Shoot
The complete set-up can be seen below. Please excuse the bad quality photgraphs as the only other digital capture device I have is an old webcam which is quite far from the the eventual set-up. The table lamp in the image is not, as you might think to light the subject, but to reduce the harshness of the flurescent light in the kitchen area by providing some shade!
 Super-Macro Make-Shift Lens Construction: Constructing a super-macro lens using two lenses, some card and some tape.
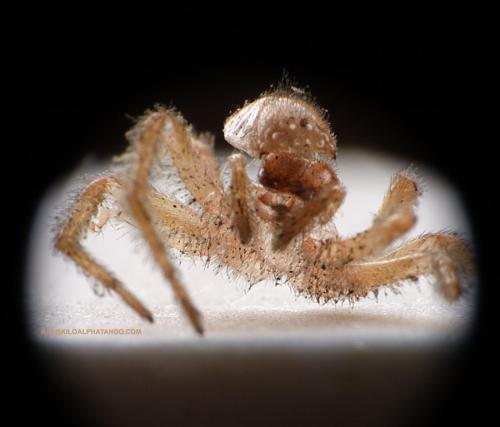
Earlier in the day I scoured my flat for suitable subjects to photograph. I eventually found a moth and a spider skin which would be excellent subjects. I decided to start with the spider skin as this would be the easier of the two to shoot. It was still daylight outside so I set up initially on my lounge window-sill. I needed to keep the aperture small to get a good depth of field in the final photograph. You can see in the picture below how awkward it is to get the subject into the circular photographable area of the image. I haven't altered the photograph below except to slightly sharpen it (I shot a RAW file which always cames out slightly soft on my camera).
 Spider Skin: A macro photo of some spider skin.
I also needed to set the exposure compensation down 2 stops to prevent the back area highlights from blowing out.
The Moth
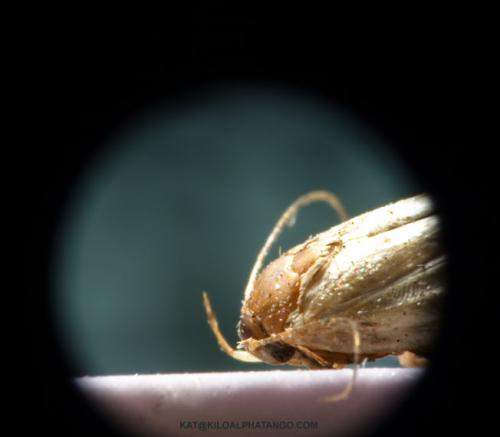
The moth needed slightly more thought given to it to make it look good. I started by just placing the moth down onto the top of the vice jaw and shooting it like that.
 Moth Head: A side view of a moth's head.
The white you can see in the image is an eraser, used only to increase the height of the subject off the top of the vice jaw so I could get the camera into the right position (the lens has to be incredibly close to the subject and the vice jaw is shaped in such a way as to make it difficult to get there without the subject being raised).
However, I really wanted a picture looking straight at the head of the moth rather than the sides. This will possibly sound ghoulish but the way the the moth had died, it's legs got in the way when trying to arrange it head on. I tried leaving the moth upside down with the idea that I could rotate the image by 180 degrees in post-processing but the resultant image wasn't really satisfactory. I decided I needed to mount my moth.
Mounting
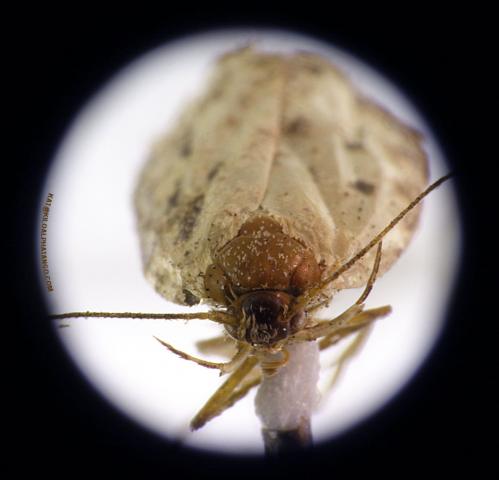
I found an old shirt pin and tried just sticking it into the moths belly. I want to say thorax rather than 'belly' but I'm not entirely sure I've named it correctly so I'll stick with belly. The moth was quite dessicated so the pin wasn't actually sticking in and staying . I needed something to make the pin stick and although melted wax was the first thing that popped into my head as a solution I don't have any candles in the flat. I compromised and tried Pritt Stick. I smeared the head of the pin with Pritt and carefully stuck it into the moth and hoped that it would hold. Then, using some tweezers and a blob of Blu-Tak, I stuck the pin to the vice jaw so that the pin was vertical and the moth was mounted. I'm sure that entomologists will either be laughing at my ineptness of crying at my misunderstanding but it seemed to work so I stuck with it. I then took many many images trying to get the moth with the correct depth of field and well lit. By this time the sun had gone down so I moved everything into my kitchen area. Initially I tried lighting my moth with the overhead flurescent light and the light from a table lanp but it was either too harsh or evenenly lit. Eventually I settled on having the flurescent light on but shading the moth with the shade from the table lamp. This left the moth quite dark so a long exposure was needed. The final image below is the one I'm most proud of of the three. The final image was shot at:
ISO: 100
Macro Lens F-Stop: 32
Exposure Time: 80 seconds
This account makes it sound like I shot very few images but I actually shot about 100 photos. It took a long time to get the moth centred nicely in the circle and to get the circle laying completely in the photographable area. I've deliberatly left the circular nature of the photos intact rather than erasing them out as I think they look more interesting like that.
I'd be very interested in any comments.
- kat's blog
- Login to post comments
- 8506 reads

Comments
Experimentation
I think its great that you are experimenting in this way. I love the front end view of the moth. Am I correct in thinking that the blob at the bottom of the circle is the Pritt stick you used to mount the carcass? It does detract slightly from the overall picture. Perhaps try superglue next time. I expect if you suspended the moth from a fine fish line it would swing in the breeze. The glass Yahoo group I belong to has some people that persist in asking " What would happen if...." instead of trying it for themselves and learning from the result. It does so annoy me. Harking back to your infra red photos, I saw on an air disaster program that they were exploring whether a crash was caused by lack of fuel. They took infra red photos of the area where the crash occurred. The volume of lost petrol could be ascertained by the darker colour of the foliage on the trees which allowed them to decide that the aircraft had sufficient fuel and this could be ruled out as the cause of the crash.
Blob
The white blob at the bottom of the circle is indeed the Pritt Stick. I'm not sure that I could get superglue to work any better although maybe with it drying clear it wouldn't be as noticable.
You can see just how small the details are when you compare them to the width of the pin that you can just see creeping in to the bottom of the picture. A nice surprise was the fact that you can see the proboscis (sp?) of the moth curled up under it's mouth. I couldn't see that at all with the naked eye and my eyes are good! It was a genuinely exciting moment, which is odd since it's just a photograph, but you kind of get the feeling that you're seeing something that no-one has ever seen before - even though that's not really true in the wider sense.
I tried to Google to try to get a feel for the likely size of the proboscis but didn't see anything in the time I spent looking. I estimate that the pin diameter is somewhere around 3/4 mm so you can make a rough estimate of how big it is from that.